Xandeum pNode Setup Guide

This document provides step-by-step instructions for setting up and managing a pNode for the Xandeum Network. Each section covers a specific part of the process, from prerequisites to troubleshooting.
If you have already run through the prerequisites and security concerns, you can skip to the installation:
Prerequisites for Setting Up a pNode for Xandeum
Before you begin setting up your pNode for the Xandeum Network, ensure you meet the following requirements. These steps will prepare your hardware, software, and environment to run xandminer and xandminerd effectively.
Hardware Requirements
- Recommended VPS: We recommend using a Virtual Private Server (VPS) from Contabo for $5.50/month. However, Contabo’s default 20 GB SSD storage is insufficient for Xandeum’s needs. Ensure your VPS or server has at least:
- 4 CPU core
- 4 GB RAM
- 80 GB SSD storage (20 GB for system operations + an additional at least 60GiB free space to dedicate to the Xandeum Network)
- 1 Gbps network
- Alternative Options: You can use any Ubuntu-based machine, including home servers or other VPS providers, as long as they meet the minimum specs above and have a stable internet connection.
- Storage for Blockchain-Grade Data: Ensure your pNode has sufficient storage (e.g., additional drives or partitions) to handle Xandeum’s blockchain-grade storage needs. xandminerd will interface with your hardware to query drives and partitions.
Software Requirements
- Operating System on pNode:
- Ubuntu 24.04 LTS or later (recommended for stability and compatibility with Xandeum software).
- Ensure the pNode has a clean, updated Ubuntu installation.
- Local Machine OS (for Managing pNode):
- Windows 10 or later, macOS, or any Linux distribution (e.g., Ubuntu, Fedora).
- Windows users must have PowerShell or Command Prompt available (built into Windows 10/11).
- SSH Client:
- Windows: Built-in OpenSSH client (available since Windows 10).
- macOS/Linux: Built-in ssh command (via OpenSSH).
- Web Browser: Any modern browser (e.g., Chrome, Firefox, Edge) to access the xandminer GUI at http://localhost:3000.
Network Requirements
- Stable Internet Connection: Your pNode and local machine need a reliable internet connection for SSH access and software updates.
- Port Availability: Ensure ports 3000 and 4000 are not blocked by firewalls or your ISP on your pNode, as it will be used for the xandminer GUI and xandminerd background service via an SSH tunnel.
- Static IP (Recommended): A static IP address for your pNode is recommended for consistent access, though dynamic IPs can work with proper DNS configuration.
Tools and Access
- Git: Installed on your pNode to clone repositories from GitHub.
- SSH Keys: You’ll need to generate an SSH key pair (Ed25519 recommended) on your local machine and add it to your pNode for secure access. Instructions for this are in the next section.
- Basic Command-Line Knowledge: Familiarity with terminal commands (e.g., ssh, curl, git) on your local machine and pNode.
Notes
Important: These prerequisites ensure your pNode can run xandminer https://github.com/Xandeum/xandminer and xandminerd https://github.com/Xandeum/xandminerd effectively. If you have questions or encounter issues, consult our Troubleshooting section or join our community on X/Discord for support.
Future BFT Consensus: As Xandeum evolves to include Byzantine Fault Tolerance (BFT) consensus, your pNode will need additional resources. We’ll provide updates in future sections.
Xandeum Network Branding: Note that “Xandeum Network” is our official branding, with both words capitalized. Visit our main website at xandeum.network for more information.
SSH Key Setup for pNode Access
To securely access and manage your pNode, you'll need to generate an SSH key pair on your local machine and configure it on your pNode. We recommend using Ed25519 keys for their security and performance, but RSA 4096 is also supported as a fallback.
Generating an SSH Key Pair
Follow these steps based on your local machine's operating system.
On Windows (Using OpenSSH)
- Requirements: Ensure you're running Windows 10 or later with PowerShell or Command Prompt available.
- Generate an Ed25519 Key:
- Open PowerShell or Command Prompt.
- Run the following command to generate an Ed25519 key pair: ssh-keygen -t ed25519
- Press Enter to accept the default file location (C:\Users\<username>\.ssh\id_ed25519) or specify a custom path.
- Optionally, enter a passphrase for added security (recommended, but optional).
- This will create two files: id_ed25519 (private key) and id_ed25519.pub (public key) in your .ssh directory.
- Fallback to RSA 4096 (if Needed): If Ed25519 isn't compatible with your pNode, generate an RSA 4096 key with: ssh-keygen -t rsa -b 4096
- Verify the Key: Check that the keys were generated by listing the .ssh directory: dir C:\Users\<username>\.ssh
On Linux or macOS
- Generate an Ed25519 Key:
- Open a terminal.
- Run the following command to generate an Ed25519 key pair: ssh-keygen -t ed25519
- Press Enter to accept the default file location (/home/<username>/.ssh/id_ed25519) or specify a custom path.
- Optionally, enter a passphrase for added security (recommended, but optional).
- This will create id_ed25519 (private key) and id_ed25519.pub (public key) in your .ssh directory.
- Fallback to RSA 4096 (if Needed): If Ed25519 isn't compatible, generate an RSA 4096 key with: ssh-keygen -t rsa -b 4096
- Verify the Key: Check the keys by listing the .ssh directory: ls -l ~/.ssh
Adding the Public Key to Your pNode
- Copy the public key (id_ed25519.pub or id_rsa.pub, depending on the key type you generated) to your clipboard:
- On Windows (PowerShell): type C:\Users\<username>\.ssh\id_ed25519.pub | clip
- On Linux/macOS: cat ~/.ssh/id_ed25519.pub | pbcopy # macOS cat ~/.ssh/id_ed25519.pub | xclip # Linux (if xclip is installed)
- SSH into your pNode using password authentication (you'll disable this later): ssh root@<my.p.node.ip> Replace <my.p.node.ip> with your pNode's IP address.
- Create or edit the ~/.ssh/authorized_keys file on your pNode: mkdir -p ~/.ssh nano ~/.ssh/authorized_keys Paste your public key into the file, save, and exit (Ctrl+O, Enter, Ctrl+X in nano).
- Ensure the permissions are correct: chmod 700 ~/.ssh chmod 600 ~/.ssh/authorized_keys
Testing SSH Access
- Exit the pNode (exit) and test SSH access using your private key:
- On Windows (PowerShell): ssh -i C:\Users\<username>\.ssh\id_ed25519 root@<my.p.node.ip>
- On Linux/macOS: ssh -i ~/.ssh/id_ed25519 root@<my.p.node.ip>
- If prompted, enter your SSH key passphrase (if you set one). You should now access your pNode without a password. If you are still prompted for a password, go back through the above steps or ask for assistance from the community.
Disabling Password Login for Enhanced Security
To maximize the security of your pNode, you should disable password-based SSH login and rely solely on SSH keys. This prevents brute-force attacks and ensures only authorized users with SSH keys can access your pNode. However, this step is irreversible without access to your SSH private key, so proceed carefully.
Important Precautions
- Ensure you've successfully tested SSH key-based access (as described earlier in this guide) before proceeding.
- Keep your SSH private key safe and backed up. If you lose it, you won't be able to access your pNode without assistance from your hosting provider.
- Run this step from a secure connection, and keep your current SSH session open in case you need to revert changes.
Using Our Script to Disable Password Login
We've created a simple script to safely disable password login on your pNode, handling common configuration file variations (e.g., /etc/ssh/sshd.d). Follow these steps: Note: will only work if you are using file naming from above (ie ~/.ssh/id_ed25519)
Note: Option 4 In the Xandeum pNode Software Installer will handle SSH hardening also. You may use either method.
- Download our SSH hardening script by running the following command in your terminal: wget https://gist.github.com/bernieblume/7c49b49e718f9e41d4802e94e7a9e103/raw/nopwlogin.sh
- Make the script executable: chmod +x nopwlogin.sh
- Run the script with sudo: sudo ./nopwlogin.sh
- Follow the on-screen instructions and verify that you can still access your pNode using your SSH key.
Manual Instructions (Advanced Users)
If you prefer to disable password login manually or the script doesn't work for your setup, follow these steps:
- SSH from your local machine into your pNode using your SSH key: ssh -i ~/.ssh/id_ed25519 root@<my.p.node.ip>
- Open the SSH configuration file in a text editor (e.g., nano or vim): nano /etc/ssh/sshd_config
- Look for the following lines and set them to no. If the lines are commented (start with #), uncomment them by removing the #: PasswordAuthentication no ChallengeResponseAuthentication no
- Check if /etc/ssh/sshd_config.d/ exists. If it does, create or edit a file (e.g., 10-disable-password-auth.conf) in that directory and add: PasswordAuthentication no ChallengeResponseAuthentication no
- Save the file and exit the editor (in nano, press Ctrl+O, Enter, then Ctrl+X).
- Restart the SSH service: systemctl restart ssh or, if that doesn't work: service ssh restart
- Test SSH access with your key to ensure you're not locked out: ssh -i ~/.ssh/id_ed25519 root@<my.p.node.ip>
Troubleshooting
- If you're locked out, restore from the backups created by the script (located at /etc/ssh/sshd_config.bak-* and /etc/ssh/sshd_config.d.bak-*) or contact your hosting provider for console access.
- If password login is still enabled, check for conflicting settings in /etc/ssh/sshd_config.d/ files and ensure the SSH service restarted correctly.
Note: Disabling password login is permanent unless you re-enable it manually or via console access. Always test key-based access before proceeding.
Installing and Configuring xandminer on Your pNode
Now that you've secured your pNode with SSH key-based authentication and disabled password login, it's time to install and configure the xandminer software to set up your pNode as a mining node. This chapter guides you through downloading and running the pNode installer script, which automates the setup of xandminer and xandminerd, including repository management, systemd service configuration, and verification steps.
Prerequisites
Before proceeding, ensure the following:
- You have SSH access to your pNode using your SSH key (as configured in the previous chapter).
- Optionally, open an ssh session tunnel that forwards the ports that will be needed later as well:
- ssh -i ~/.ssh/id_ed25519 root@<my.p.node.ip> -L 4000:localhost:4000 -L 3000:localhost:3000 8000:localhost:8000
- This will allow port http://localhost:3000 in your web browser to connect through the ssh tunnel to your xandminer
- Port 4000 is used to connect the GUI to the xandminerd service
- Port 8000 is used for the stats page
- Your pNode is running a compatible Linux distribution (e.g., Ubuntu 20.04 or later, Debian 11 or later).
- You have root privileges on your pNode.
- Git, curl, and systemd are installed on your pNode. You can install them with: apt update && apt install -y git curl systemd
- Restart if prompted to load newer kernel
Downloading and Running the pNode Installer
We've created a simple installer script to automate the setup of xandminer and xandminerd on your pNode. This script checks for critical security settings, clones or updates the repositories, configures systemd services, and provides instructions for the next steps.
Steps to Run the Installer
- SSH from your local machine into your pNode using your SSH key: ssh -i ~/.ssh/id_ed25519 root@<my.p.node.ip> -L 4000:localhost:4000 -L 3000:localhost:3000 8000:localhost:8000 Replace <my.p.node.ip> with your pNode's IP address.
- Download the installer script by running the following command in your terminal: wget -O install.sh "https://raw.githubusercontent.com/Xandeum/xandminer-installer/refs/heads/master/install.sh"
- Make install.sh executable chmod a+x install.sh
- Run the script with sudo: ./install.sh
- Follow the on-screen instructions and verify the output to ensure the installation completed successfully. Choose option: 1. Install Xandeum pNode Software
What the Installer Script Does
The installer script performs the following actions:
- Repository Management:
- Checks if the xandminer and xandminerd directories exist in /root.
- If the directories don't exist, the script clones the respective Git repositories into /root/xandminer and /root/xandminerd.
- If the directories exist, the script changes into each directory and runs git pull to update the repositories to the latest version.
- Systemd Service Configuration:
- Copies the xandminer.service and xandminerd.service files (located in the root directory of their respective repositories) to /etc/systemd/system.
- Enablesand starts the services using systemctl enable xandminer.service --now and systemctl enable xandminerd.service --now
- Success Message: Outputs a success message indicating that the services are enabled and running, along with a link to the documentation for further instructions (using a placeholder for now, e.g., <docs-link>).
Troubleshooting
- If Git cloning or pulling fails, ensure you have an active internet connection and the necessary permissions on your pNode.
- If systemd service configuration fails, check the permissions of /etc/systemd/system and ensure systemd is properly installed and running.
Next Steps
Once the installer script has completed successfully, it is reccomeended to restart your pNode to load any new kernel drivers. Xandminer and xandminerd services will be running upon reboot. Refer to the documentation at <docs-link> for detailed instructions on starting, monitoring, and troubleshooting the services, as well as configuring xandminer for optimal mining performance.
Starting and Monitoring xandminer Services
Now that you’ve installed and enabled the xandminer and xandminerd services on your pNode using the installer script, it’s time to start them and monitor their operation. This chapter walks you through manually starting the services, checking their status, reviewing logs, and troubleshooting common issues to ensure your pNode is mining effectively.
Prerequisites
Before proceeding, ensure the following:
- You have SSH access to your pNode using your SSH key (as configured in the “SSH Key Setup” chapter).
- The xandminer and xandminerd services are installed and enabled on your pNode (as described in the “Installing and Configuring xandminer on Your pNode” chapter).
- You have root privileges on your pNode.
Starting the xandminer and xandminerd Services
The installer script enabled the services but did not start them. Follow these steps to manually start the services:
- SSH into your pNode using your SSH key: ssh -i ~/.ssh/id_ed25519 root@<my.p.node.ip> -L 4000:localhost:4000 -L 3000:localhost:3000 8000:localhost:8000 Replace <my.p.node.ip> with your pNode’s IP address.
- Start the xandminer service: systemctl start xandminer
- Start the xandminerd service: systemctl start xandminerd
Checking Service Status
After starting the services, verify they are running correctly:
- Check the status of the xandminer service: systemctl status xandminer Look for output indicating “active (running)” and no errors. If the service isn’t running, you’ll see “inactive” or “failed.”
- Check the status of the xandminerd service: systemctl status xandminerd
Sample Output for a Running Service
Here’s an example of what a running service status might look like:
xandminer.service - xandminer Mining Service
   Loaded: loaded (/etc/systemd/system/xandminer.service; enabled; vendor preset: enabled)
   Active: active (running) since Fri 2025-02-21 10:00:00 UTC; 5min ago
 Main PID: 12345 (xandminer)
    Tasks: 10 (limit: 4915)
   Memory: 50.0M
   CGroup: /system.slice/xandminer.service
           └─12345 /usr/bin/xandminer --config /root/xandminer/config.json
Or, if there’s an issue:
xandminer.service - xandminer Mining Service
   Loaded: loaded (/etc/systemd/system/xandminer.service; enabled; vendor preset: enabled)
   Active: failed (Result: exit-code) since Fri 2025-02-21 10:05:00 UTC; 1min ago
     Docs: <docs-link>
  Process: 12346 ExecStart=/usr/bin/xandminer --config /root/xandminer/config.json (code=exited, status=1/FAILURE)

### Monitoring Logs
To troubleshoot or monitor the services, check their logs using `journalctl`:

1. View logs for xandminer:
   `journalctl -u xandminer`
2. View logs for xandminerd:
   `journalctl -u xandminerd`

You can also tail the logs in real-time:
   `journalctl -u xandminer -f`
   `journalctl -u xandminerd -f`
Look for any error messages, warnings, or indications of successful mining activity (e.g., connection to the mining pool, hash rates, etc.).
Troubleshooting Common Issues
If the services fail to start or aren’t running as expected, try the following:
- Check Permissions: Ensure the service files in /etc/systemd/system and the repository directories (/root/xandminer, /root/xandminerd) have the correct permissions:
   chmod 644 /etc/systemd/system/xandminer.service
   chmod 644 /etc/systemd/system/xandminerd.service
   chmod -R 755 /root/xandminer
chmod -R 755 /root/xandminerd- Restart Services: If you make changes, restart the services: systemctl restart xandminer systemctl restart xandminerd
- Review Logs: Use journalctl to identify specific errors (e.g., missing dependencies, configuration issues, or network problems).
- Verify Dependencies: Ensure all required dependencies for xandminer and xandminerd are installed.
- Check Network: Ensure your pNode has internet access and can connect to the mining pool (if applicable).
Enabling Automatic Startup (Optional)
If you want the services to start automatically on boot (in addition to manual starting), you can enable them (though this was already done by the installer): systemctl enable xandminer systemctl enable xandminerd
Next Steps
Once the services are running and monitored, you can configure xandminer for optimal mining performance.
Setting Up an SSH Tunnel and Accessing the xandminer Web GUI
To manage your pNode remotely and access the xandminer web-based graphical user interface (GUI) securely, you can set up an SSH tunnel using OpenSSH on Windows. This chapter guides you through creating an SSH tunnel to forward traffic from your local machine to the xandminer web GUI running on your pNode, ensuring secure and encrypted access.
Prerequisites
Before proceeding, ensure the following:
- You have SSH access to your pNode using your SSH key (as configured in the “SSH Key Setup” chapter).
- The xandminer and xandminerd services are installed, enabled, and running (as described in the “Starting and Monitoring xandminer Services” chapter).
- The xandminer web GUI is enabled and configured on your pNode.
- You have root privileges on your pNode.
- You have OpenSSH installed on your Windows machine. You can install it via Windows 10/11 Settings under “Optional Features” or through Windows Subsystem for Linux (WSL).
Enabling the xandminer Web GUI
Open an SSH tunnel that forwards the proper ports through the tunnel, ensure the xandminer service is enabled and running on your pNode:
- SSH into your pNode using OpenSSH on Windows: ssh -i %userprofile%\.ssh\id_ed25519 root@<my.p.node.ip> -L 4000:localhost:4000 -L 3000:localhost:3000 8000:localhost:8000 Replace <my.p.node.ip> with your pNode’s IP address.
- Check if the xandminer web GUI service is installed and enabled: systemctl status xandminer If the service isn’t running or installed, refer to the xandminer installation instructions.
- Start and enable the xandminer web GUI service: systemctl enable --now xandminer
- Verify the GUI is accessible locally on the pNode (if on the same network) by opening a web browser on the pNode and navigating to http://localhost:3000 (or the port specified in the documentation).
Setting Up an SSH Tunnel with OpenSSH on Windows
The xandminer web GUI typically runs on a local port (e.g., 3000) on your pNode, but it may not be exposed publicly for security reasons. You can use an SSH tunnel with OpenSSH on Windows to forward traffic from your local machine to the pNode’s GUI port securely.
- Open a Windows Command Prompt, PowerShell, or WSL terminal on your local machine and create an SSH tunnel to forward local ports 3000 and 4000 to the pNode’s ports 3000 and 4000: ssh -i %userprofile%\.ssh\id_ed25519 -L 4000:localhost:4000 -L 3000:localhost:3000 8000:localhost:8000 root@<my.p.node.ip>
- -L 3000:localhost:3000 forwards local port 3000 to port 3000 on the pNode.
- -L 4000:localhost:4000 forwards local port 4000 to port 4000 on the pNode.
- -L 8000:localhost:8000 forwards local port 8000 to port 8000 on the pNode.
- Replace <my.p.node.ip> with your pNode’s IP address.
- Keep the terminal window open to maintain the tunnel. The SSH connection will stay active until you close the terminal, the session times out, or the connection is interrupted.
- Open a web browser on your local machine and navigate to http://localhost:3000 to access the xandminer web GUI.
Managing the SSH Tunnel
When using an SSH tunnel, consider the following guidance to manage it effectively and securely:
- Leaving the Tunnel Open: You can leave the SSH tunnel open while actively managing your pNode via the xandminer web GUI. This allows continuous access to the GUI without needing to recreate the tunnel frequently. However, be aware that the tunnel might close over time due to network interruptions, idle timeouts, or system sleep/hibernate modes on your local machine or pNode.
- Reopening the Tunnel: If the tunnel closes (e.g., due to a network disconnection or timeout), you’ll need to reopen it by rerunning the SSH command: ssh -i %userprofile%\.ssh\id_ed25519 -L 4000:localhost:4000 -L 3000:localhost:3000 root@<my.p.node.ip> Check the terminal for error messages (e.g., “Connection closed” or “Connection timed out”) to diagnose why the tunnel closed.
- Avoid Leaving Unattended for Too Long: Do not leave the SSH tunnel open for extended periods when you’re not actively using it, such as when you leave your PC unattended for hours or overnight. Leaving the tunnel open unnecessarily can expose your pNode to potential security risks if the connection is compromised or if your local machine is left unsecured. Close the terminal or disconnect the SSH session (exit or Ctrl+C) when you’re done using the GUI to minimize risks.
Checking the pNode ports:
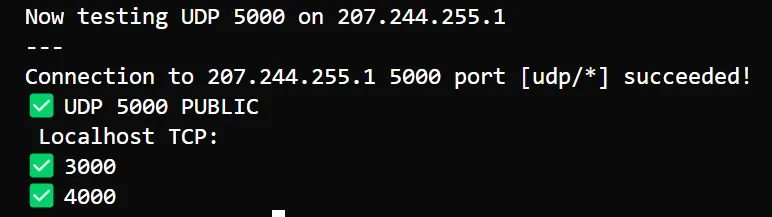
Use this one-line command to check if the correct ports are accessible from the public interent. It tests public UDP 5000 and localhost TCP 3000 and TCP 4000 The tool uses nc (netcat) and ss (socket statistics) to test the pNode ports.
MY_IP=$(curl -s https://ipinfo.io/ip) && echo " UDP 5000 on $MY_IP" && if command -v nc >/dev/null 2>&1; then timeout 10 nc -zu $MY_IP 5000 && echo "✅ UDP 5000 PUBLIC" || echo "❌ UDP 5000 NOT PUBLIC"; else echo "⚠️ netcat (nc) not installed - cannot test UDP 5000"; fi && echo " Localhost TCP:" && for port in 3000 4000; do ss -tlnp 2>/dev/null | grep -q "127.0.0.1:$port " && echo "✅ $port" || echo "❌ $port"; doneThe output should look like this: If you have any red X marks next to a port you need to investigate the connection issues.
This section is now complete. See below for advanced and future features.
Otherwise, continue on to Register your pNode on the Xandeum DevNet.
Troubleshooting SSH Tunnels and Web GUI Access
If you encounter issues, try the following:
- Connection Refused: Ensure the xandminer web GUI service is running on the pNode: sudo systemctl status xandminer Start it if necessary: sudo systemctl enable --now xandminer.
- Port Conflict: Verify port 3000 (or the configured GUI port) isn’t in use by another service on your local machine or pNode: sudo netstat -tuln | grep 3000
- SSH Key Issues: Confirm your SSH key is correctly configured and permissions are set (e.g., chmod 600 %userprofile%\.ssh\id_ed25519 on WSL or via a Linux-like file manager on Windows).
- Firewall Rules: Ensure port 3000 is open on the pNode for local access (if not using a tunnel, though tunnels bypass external firewalls): ufw allow 3000/tcp
- Browser Issues: Clear your browser cache or try a different browser if the GUI doesn’t load.
Automating SSH Tunnels (Optional)
For frequent access, automate the SSH tunnel using a batch script or SSH configuration:
- Create a batch script (e.g., start_ssh_tunnel.bat): @echo off start cmd /k "ssh -i %userprofile%.ssh\id_ed25519 -L 3000:localhost:3000 -L 4000:localhost:4000 root@<my.p.node.ip>" Save it, double-click to run, and it will open a new Command Prompt window with the tunnel. Close the window to terminate the tunnel.
- Or, edit your SSH config (%userprofile%\.ssh\config) to include a tunnel: Host <pnode-hostname> HostName <my.p.node.ip> User root IdentityFile %userprofile%.ssh\id_ed25519 LocalForward 3000 localhost:3000 LocalForward 4000 localhost:4000 LocalForward 8000 localhost:8000
Then connect with: ssh pnode
Next Steps
With the SSH tunnel and xandminer web GUI set up, you can remotely manage your pNode’s mining operations securely. Use the GUI to complement the command-line tools and monitoring scripts from previous chapters.